Capability Index, Cp
Cp is a process index that describes variation relative to the tolerances or specifications.
Cp is a short term process index that numerically describes the "within subgroup" or "potential" capability (Pp is long term indicator) of a process assuming it was analyzed and stays in control.
Physically speaking, it's the width of the distribution regardless of centering around the process mean or a target value. The tighter (thinner) the distribution the higher the Cp.

It is an option (along with z-score and PPM) when describing the process baseline measurement in the MEASURE phase or in the CONTROL phase when obtaining the final performance analysis.
A Cp value of 1.0 means that the width of the process and the width of the specification are equal.
Characteristics and notes for using Cp:
- The Cp has no value for unilateral tolerances. Unilateral means that only the LSL or USL is provided, the calculation of Cp requires both specifications.
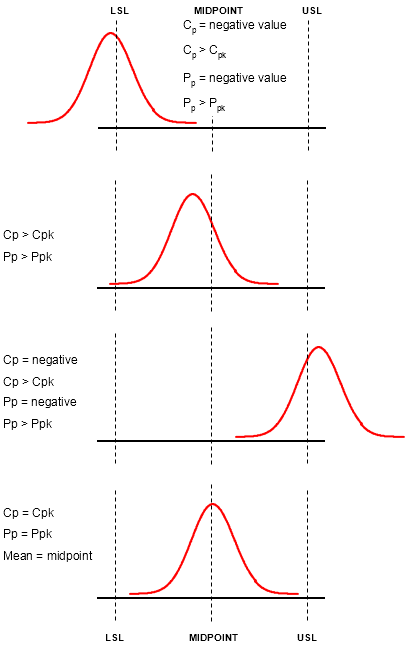
- Cp is always greater than or equal to the value of Cpk.
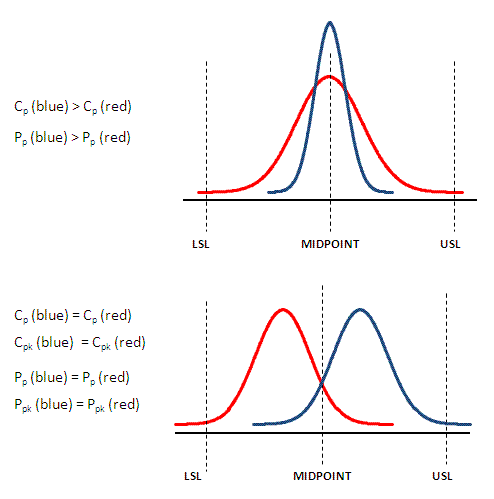
- A perfectly centered process with the mean on the midpoint of the tolerances will have Cp = Cpk.
- Cp should always be analyzed with Cpk, as Pp should always be analyzed with Ppk.
- Short term process index ("within subgroup").
- Similar to Pp, the Cp capability index is a function of the standard deviation, not a nominal (target) value that may be historical or provided by the customer. It also requires input from the customer for the lower specification limit (LSL) and upper specification limit (LSL).
- Cp is the number of times the spread of the process fits into the specifications (or tolerances) width.
As with all the process capability indices, ideally the process should be in control before assessing capability. Use time-series and SPC charts to determine process control.
If the process is out of control (i.e. still rising with upward trend), then assessing current process performance is not likely to reflect the long term performance. An out of control process could produce and capability value at any time, it's like a shot in the dark.
Once the Cp is calculated a determination of acceptability is done. Customers vary in their minimum requirement (acceptability limit) for the values of capability indices.
As the pursuit for perfection increases these minimum acceptability levels will increase which means that process must perform with less and less variation.
Cp formula

when the "process capability" estimate for sigma (below) is substituted in the above formula. Also called the "within subgroup" estimate for sigma

where R-bar is the average of the ranges from each subgroup estimated from the X-bar & R control chart. The value for "d" is found from a table based on the subgroup size.
In most practical cases, the Cp can be simply = (USL - LSL) / 6 * standard deviation
There are other estimates for this sigma value, the above estimation is commonly used.
>1.33 or >1.67 are typical acceptability levels for Cp.
A high value for Cp and low value for Cpk means the process is precise (narrow distribution) but work needs to be done to get the mean centered around the midpoint of the specification limits.
Recall, that a Cp value of 1.0 means that the width of the process and the width of the specification are equal.
The required values may be available in the form of published
standards or it may need to be requested specifically. The amount of samples
required and subgroup sizes (if applicable) for capability analysis and control
charts can also vary by customer and needs to be determined before starting
these calculations.
Cp is a measure of variation only.
Cpk is a measure of location and variation.
Cp will never be a negative number.
Cpk can be a negative number.
The higher the value for Cp (tighter and tighter spread within the subgroup) and Cpk (tighter and centered) the better the process is performing.
Example with formulas
See this example data set with 20 samples and a given USL of 600 and LSL of 550. You can see the formulas in Excel applied to get the answers to the right.
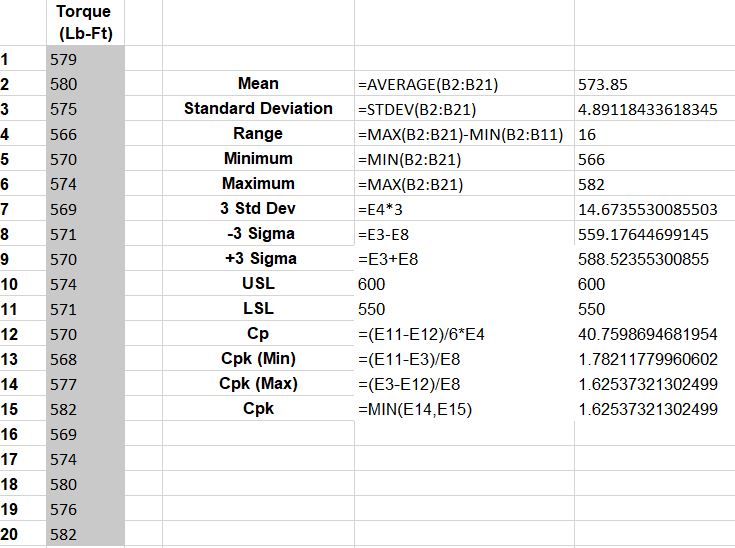
Notice there is not on single data point (observation) that is outside the specification limits so if you are thinking of using the DPMO method to get to a Cpk or z-score, that would not be ideal since it will show perfection. Recall, this is only 20 samples out of a potentially infinite population.
The Cpk values are both high (relatively speaking) and most often acceptable in industrial practices. The applied (the lower of the two) Cpk is = 1.625 and Cp = 40.76
The data is centered (mean of 573.85 is very close to 575) and the spread is narrow.
If the centering doesn't matter, then Cp, is an adequate measure. All of the readings could be tight (precise) but shifted toward either the LSL or USL.
The question is what value of Cp does the customer allow? The customer will often times specify a minimum Cpk value but if the centering is irrelevant, you should request a minimum Cp value.
Visual Relationship of Capability Indices
Additional Visual Aids
General rule of thumb

Ever heard of Machine Capability?
Cp and Cpm and machine capability indices. These are very short term indicator of the machines optimal performance. Click the links below to learn more.
Return to Process Capability
Return to the MEASURE phase
Search for jobs related to Six Sigma
Templates, Tables, and Calculators
Return to Six-Sigma-Material Home Page

Site Membership
LEARN MORE
Six Sigma
Templates, Tables & Calculators
Six Sigma Slides
Green Belt Program (1,000+ Slides)
Basic Statistics
Cost of Quality
SPC
Control Charts
Process Mapping
Capability Studies
MSA
SIPOC
Cause & Effect Matrix
FMEA
Multivariate Analysis
Central Limit Theorem
Confidence Intervals
Hypothesis Testing
Normality
T Tests
1-Way ANOVA
Chi-Square
Correlation
Regression
Control Plan
Kaizen
MTBF and MTTR
Project Pitfalls
Error Proofing
Z Scores
OEE
Takt Time
Line Balancing
Yield Metrics
Sampling Methods
Data Classification
Practice Exam
... and more


