|

 content.")
Pugh Matrix
The Pugh Matrix was developed by British product designer and mechanical engineer, Stuart Pugh. It's a numerical decision-making tool normally used within DFSS (aka DMADV) Six Sigma projects. Its purpose is to validate multiple concepts and come to an agreement for the final design selection to proceed forward.
An effective output from the Pugh Matrix requires a team that is familiar with the concepts and weighting criteria. It's also important that they remain unbiased toward a particular design to allow this tool to do its job. The results will only be as good as its inputs.
Any decision matrix is intended to remove bias and opinions with the intent of making as much of the subjectivity more objective. The most time-consuming part of this exercise is the creation of the matrix and scoring criteria. The assessments go rather quickly, and the calculation is simple.
Remember GIGO (Garbage IN = Garbage OUT). Take the time to establish the matrix properly, get qualified assessors (the team), review the design concepts together and this should lead to the most meaningful results.
This is similar to other decision matrix that are numerical based such as the Correlation Matrix and FMEA (where the RPN is calculated by the Severity score * Occurrence score * Detection score) which are also used to make improvement decisions.
Both of these tools are commonly used in the DMAIC process to make subjective decisions on existing processes where the Pugh Matrix is used for a new design.
How to create a Pugh Matrix
1. Choose the Design Options
Select the options of the design to be compared. There may be numerous design options up for selection. List them along the top of the matrix and ensure that each person understand the concept thoroughly and the pros and cons to each design.
2. Selection Criteria (Critical to Quality Factors)
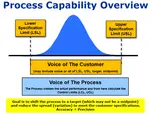
Review the Voice of the Customer and gather the requirements from the customer to identify the selection criteria. Remember, the customer may not only be the end user but can also be the company you work for.
Some examples may be ROI, eco-friendly, investment capital, time-to-market, color, weight, size, hardness, strength, cost, appearance, flexibility, durability, smell, ease of maintenance, and list could go on infinitely.
List these criteria vertically along the matrix template.
3. Establish a Reference Design
Select the options of the design to be compared. There may be numerous design options up for selection. At this point, identify as many design options as possible and add them to the left column of the matrix. The reference design is one that already exist or one that the team wants to compare all the other design concepts.
4. Establish Weights for each CTQ
Establish a weight for each criterion chosen in Step #2. A "must-have" criterion should be given a maximum weight which is usually a 10. Use of the Kano Model prior to the Pugh Matrix can help gather the Voice of the Customer and is required to properly assign weights at this point. Usually, the scores go from 1-10 with 1 being the least important and 10 the most important.
NOTE:
Try to assign a different value for each criterion and use full spectrum of 1-10. If everything is weighted a 9 or 10, then the calculation will not be as meaningful to help differentiate which design is better.
There is a tendency to give all the criteria a very high weight. Of course, all the criteria have some importance but the lowest of the best, should be given a 1 (or a much lower score) than the most important criteria.
5. Compare to the Reference Design
Looking at all the concepts collectively assign one of the following values:
- 0: the reference concept gets a 0 and any very similar design is also assigned a 0 which indicates a design in similar (not better or worse) than the reference design.
- +1: the design is better than the reference design.
- -1: the design is worse than the reference design.
The word "better" can mean a lot of things to different people. This is one of the disadvantages of the numerical based matrices. It is best to discuss the pros/cons of each design thoroughly and have constructive dialogue about each design before assigning scores. This way, everyone is educated on the pros/cons and can provide a score based on maximum information possible.
6. Calculate
Calculate the weighted sum of each design. Theoretically, the design with the highest weighted sum is the ideal selection. See the example below.
Pugh Matrix Example & Template
The figures below are to illustrate an example. The first steps are adding the Concepts, CTQ's, and Weights for each CTQ. The assignment of the Reference Scores of +1, 0, and -1 are the last step in this process.
Click here for this Pugh Matrix template, along with an example, to download, as well as several other Lean Six Sigma Templates, Statistics Tables, and Calculators. Subscribers can get all the Templates, Tables, and Calculators at a discounted rate.

The design option with the highest overall score of 49 is Design Option 6. The calculation is the sum of the products of the CTQ Weight * the Reference Score.
In this case there are 13 CTQ's listed and therefore there are 13 products to sum together to get the overall weighted score for each design concept.
(3*1)+(6*0)+(8*0)+(10*1)+(7*0)+(5*1)+(7*1)+(4*1)+(1*0)+(10*1)+(9*1)+(6*1)+(5*-1) = 49

%20Six%20Sigma%20projects.%20Its%20purpose%20is%20to%20validate%20multiple%20concepts%20and%20come%20to%20an%20agreement%20for%20the%20final%20design%20selection%20to%20proceed%20forward.)
Disadvantages of a Pugh Matrix
Any output for an numerical based decision matrix requires common sense and a practical review. Numerical based matrices may not consider interrelationships, must-haves, or other dependencies. If your team is making assumptions about a design when assigning Reference Scores, make sure to write down those assumptions for future reference.
Most of the values assigned to the options are best estimates rather than backed up with data. However, if there is data or some form of quantitative evidence then this should be reviewed by the team before assigning a Reference Score.
Some design options or criteria may be left out. Often times, during the course of completing the matrix there is valuable dialogue that surfaces more ideas. This can be good and bad. It's good to foster creativity and ensure these are added to the matrix but can turn this into a long and tedious exercise.
The goal is to get a numerical result for each design that allows the team to see which scored the best, lowest, and so forth.
If necessary, to help get more resolution and pick out differences more accurately, add more Reference Scores such as 0, +0.5, +1, -0.5, -1.0 for the comparison portion but it's important that everyone agrees and understand the differences.
It isn't a perfect tool and very few tools on their own are perfect tools. They all require additional thinking to ensure the output is practical and realistic.
Six Sigma Templates, Tables, and Calculators
Subscribe to get access to entire site, discounts, and free downloads
Recent Articles
-
Process Capability Indices
Oct 18, 21 09:32 AM
 Determing the process capability indices, Pp, Ppk, Cp, Cpk, Cpm
 -
Six Sigma Calculator, Statistics Tables, and Six Sigma Templates
Sep 14, 21 09:19 AM
 Six Sigma Calculators, Statistics Tables, and Six Sigma Templates to make your job easier as a Six Sigma Project Manager
 -
Six Sigma Templates, Statistics Tables, and Six Sigma Calculators
Aug 16, 21 01:25 PM
Six Sigma Templates, Tables, and Calculators. MTBF, MTTR, A3, EOQ, 5S, 5 WHY, DPMO, FMEA, SIPOC, RTY, DMAIC Contract, OEE, Value Stream Map, Pugh Matrix -
Six Sigma, Six Sigma Training, Courses, Calculators, Certification
Aug 15, 21 10:27 PM
 One site with the most common Six Sigma material, videos, examples, calculators, courses, and certification.

Site Membership
LEARN MORE
Six Sigma
Templates, Tables & Calculators
Six Sigma Slides
Green Belt Program (1,000+ Slides)
Basic Statistics
Cost of Quality
SPC
Control Charts
Process Mapping
Capability Studies
MSA
SIPOC
Cause & Effect Matrix
FMEA
Multivariate Analysis
Central Limit Theorem
Confidence Intervals
Hypothesis Testing
Normality
T Tests
1-Way ANOVA
Chi-Square
Correlation
Regression
Control Plan
Kaizen
MTBF and MTTR
Project Pitfalls
Error Proofing
Z Scores
OEE
Takt Time
Line Balancing
Yield Metrics
Sampling Methods
Data Classification
Practice Exam
... and more